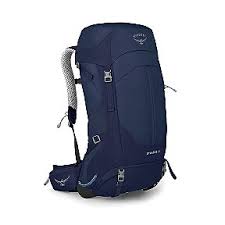
Backpack – Next to your footwear, your pack is likely the next most important item on your packing list. It needs to be large enough to hold your stuff – but small enough to keep you from bringing too much. I strongly recommend purchasing your pack from a reputable outdoor store that can help with both the selection and fitting of your pack.

For this trip, I chose an Osprey Stratos 34 Liter back. It came with a built-in rain cover. The pack has an arched frame that has a mesh that sits against your back and space for air to flow. The hip belt has zippered pockets on each side for easy access items. The main compartment is accessed from a zipper on top. There are two smaller pockets on top with mesh liners for valuables and other quick-access items. Besides the bottom pocket where the rain cover lives, below the main compartment is another zippered area originally intended for carrying a sleeping bag. I’ll be using this chamber for my sandals – so they don’t get other items dirty – and my rain jacket – so I can access it in a shower without getting any of my other gear wet.
Besides all the zippered pockets (8 total), there are oversized pouches on both sides for water bottles and straps for attaching things to the outside of the pack. With all this. The pack is still small enough to be a carry-on piece of luggage for my flights! (1500 grams/3.3 pounds)
Fanny pack – While the bulk of my gear will be in the Osprey, every Camino hiker should have a fanny pack to act as an over-sized wallet. Most wear these not across your back, but in front for easy access to money, passport, snacks, phone, sunscreen, etc. Mine is an REI Co-op Trail 2 Waist Pack. While any little fanny pack will probably do, what I liked about this one was the abundance of pockets. There is a narrow front pocket, a large main pocket and inside the main pocket are two zippered “slip pockets” where valuables can hang out. The overall size is 2 liters, which should provide enough room to toss in some fruit or other snacks for the trail. While you can drop your backpack and leave it with confidence most places, you NEVER let you fanny pack out of your sight. (113 grams)
Day pack – another pack you ask? Why yes. But this one is tiny and serves a couple of purposes. It folds up on itself and when folded is about the size of a chicken egg. It weighs less than 4 ounces (110 grams). The two primary purposes are as a grocery carrier and a laundry bag. But if you are having a rest day, but still want to see the sights of the city, it also makes a great day pack. I bought mine a couple years ago for a trip to SE Asia. It’s the 16 liter version of 4Monster Hiking Daypack. (110 grams)
Dry bags – with most items being stored in one giant pocket of your pack, a system to keeps things organized will save you time and a lot of hassle. Using dry bags not only keep like items together, but also have compression features to squeeze things down and provide some degree of protection should you encounter heavy rain. I purchased a 5-piece set from Frelaxy. The bags are color-coded and each a different size (3, 5, 10, 15 and 20 liter). While I haven’t finalized my packing plans yet, I have my outer clothing in the 15L and my daily wear in the 10L at this point. I don’t see me taking the biggest bag, but will likely use the 3 and 5L for Electronics and Miscellaneous. (181 grams – total for 4 bags)


Toiletry bag – I have a Travelon Compact Hanging Toiletry Kit that I bought on Amazon. It folds up to about 9″x5″ and has two zippered mesh pockets and three mesh elastic pouches for small bottles. It has a fairly large plastic hook so if you don’t have counter space, you can hang it on a towel hook. (91 grams)

Carabiners – I have a couple of loose super lightweight carabiners that I intend to bring in case I need to hang things from the outside of my pack. (15 grams total)
